By default, AWS Elasticsearch takes a daily snapshot of all indices. However, these snapshots are not accessible outside the elasticsearch domain.
...
- Go to IAM > Policies > Create Policy
Click the JSON tab and paste the following policy template:
{
|
{
"Version": "2012-10-17", |
{
{
"Sid": "VisualEditor0", |
[
],
[
s3repobucket",
"s3repos3repo-bucket",
"s3repo-role-arn", |
]
},
{
]
}, {
"Sid": "VisualEditor1", |
[
],
            ],
"Resource": "arn:aws:s3::: |
s3repolocation
}
]
}
- Now replace the values in the "Resource" of the policy:
- s3repobuckets3repo-bucket: the name of the s3 bucket you'll use to store the repository
- E.g. emite-clientname-es-snapshots
- s3repo-role-arn: the full arn of the role you created in the previous step
- E.g. arn:aws:iam::134921829281:role/emite-elasticsearch-s3repo
- elasticsearch-arn: the full arn of the domain in the prerequisite
- E.g. arn:aws:es:ap-southeast-2:134921829281:domain/emite-kinesis-connect
- s3repolocations3repo-location: the full name of the s3 backup location\
- E.g. emite-clientname-es-snapshots/repository
Using our example values, you should have something like this in the policy:
{
{
"Sid": "VisualEditor0", |
[
],
[
 [
"arn:aws:s3:::emite-clientname-es-snapshots", |
"arn:aws:iam::134921829281:role/emite-elasticsearch-s3repo", |
"arn:aws:es:ap-southeast-2:134921829281:domain/emite-kinesis-connect/*" |
]
},
{
            ]
        }, {
"Sid": "VisualEditor1", |
[
],
            ],
"Resource": "arn:aws:s3:::emite-clientname-es-snapshots/repository/*" |
}
]
Click Review Policy
- Policy Name: emite-elasticsearch-s3repo-policy
- Description: Policy to allow elasticsearch access to S3 as repository
- Click Create Policy
- Attach Policy to the new Role
- Go back to IAM > Roles
- Click the emite-elasticsearch-s3repo role
- Under Permissions Tab - click Attach policies
- Select the emite-elasticsearch-s3repo-policy, click Attach Policy
- Attach Policy to the eMite Role
- As part of the eMite deployment - there should be another IAM role used by eMite to gain access to Amazon Connect / Kinesis streams
- For eMite-hosted (SaaS deployment) - this will be the role that the eMite server assumes to gain access to your AWS resources
- If you're not sure about the IAM Role - please contact eMite team
- The eMite team will check the eMite server/adapter config and send you back the name of the IAM Role
- For customer-hosted deployment - this will the IAM Role attached to the eMite server
- Go back to IAM > Roles
- Click the role
- Under Permissions Tab - click Attach policies
- Select the emite-elasticsearch-s3repo-policy, click Attach Policy
...
- Install Postman App on the server
- Get the keys / token details by assuming a role via AWS CLI call to STS
- Open powershell
- aws sts assume-role --role-arn "<ARN of AWS Role used by adapters>" --role-session-name AWSCLI-Session --external-id <external id>
- ARN of AWS Role used by adapters - use the arn configured on the Kinesis/Amazon Connect adapters
- external id - use external id configured on the Kinesis/Amazon Connect adapters
- STS should respond back with a temporary set of keys and token like the example below

- Take note of the AccessKeyId, SecretAccessKey, SessionToken
- Open Postman App - Create New Request
- Authorization Tab
- Set Type: AWS Signature
- Set AccessKey
- Set SecretKey
- Set AWS Region: current region, i.e. us-east-1
- Set Service Name: es
- Set Session Token
- Body Tab
- Set Request Type to PUT

- <Elasticsearch URL>/_snapshot/ES_Backup_Recov
- Body Details:

- Set raw - JSON
- Add the following:
{
"type": "s3",
"settings": {
"bucket": "<bucket name>",
"base_path": "<repository/subrepository2>",
"region": "<current region, i.e. us-east-1>",
"role_arn": "<full role ARN, i.e. arn:aws:iam::<CustomerAWSAccountId>:role/emite-elasticsearch-s3repo>"
}
}
- bucket - get the bucket name from full backup location
- base_path - the additional path on the full backup location
- role_arn - the full role ARN
- Run the request
- It should return acknowledged: true
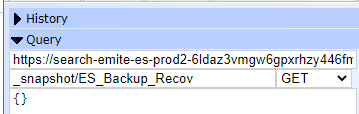
- Check repository
- Go to Elasticsearch Head on Chrome
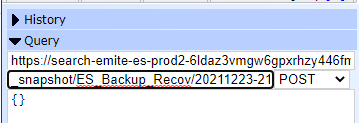
- Take a snapshot
- POST <Elasticsearch URL>/_snapshot/ES_Backup_Recov/<snapshot name>
- It should return acknowledged: true
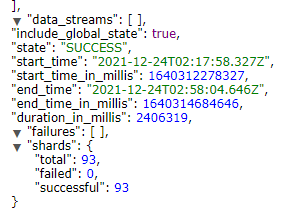
- Check the snapshot name, then wait for the State to be SUCCESS
- The snapshot has been completed at this point.
...