| Table of Contents |
|---|
...
Overview
...
/ Description
The Report Scheduler option under Manage menu allows you to create snapshots of eMite’s HTML dashboard pages. It’s It is the exact reproduction of the user dashboards. This can be used to create the following document types :
...
of PDF, Word, PPT, Excel, PNG, and JPG.
More than one page can be generated in a single document. The snapshot of pages can be taken in a scheduled time as chosen by user.
Both admin and non-admin users are able to can use Report Generator. It supports both landscape and portrait mode of the document. Report
Report Generator also has the ability to archive the created reports so that we can have the historical view of the reports. The reports can also be sent by email after creation.
...
Permission
From 6.0.1, the minimal role to schedule reports is changed to DashboardExplorer.
The following roles have permission to schedule the report:
DashboardExplorer
DashboardCreator
DashboardAdmin
EmiteAdmin
Dashboard viewer will not have access to report schedule page.
Set Configuration
...
Report Scheduler
The Report Generator works with the Scheduler. The reports are created according to the schedule you set for them. For example, you can set the schedules to be daily, weekly, or anything that suits your needs. In order to set the Report Generator schedule follow the below steps:
- In the dashboard page go to Manage -> Schedule, a new page will be opened. You can view your available schedules here in this page.
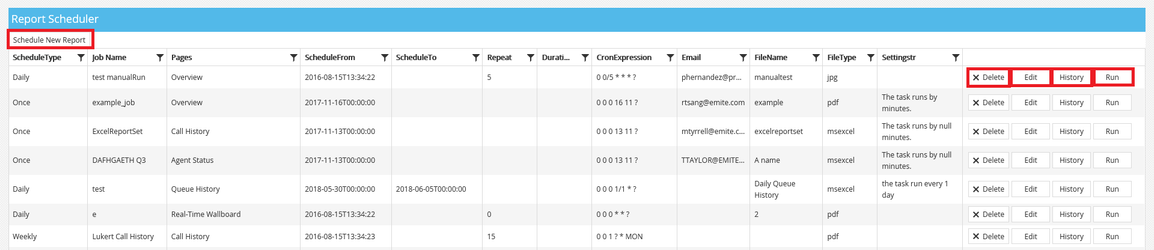
- To create a new schedule click on “Schedule New Report” button. A window like the below picture will be shown.
...
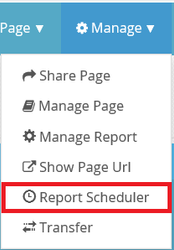
1. Click on the Manage menu, then select Report Scheduler.
...
2. Click Schedule New Report to create a new schedule.
...
The Report Scheduler setting will display.
...
3. Select the page/s you want to take snapshot of on the left side of the window. Only the available pages that the user has access to will be displayed. For each page, you may select to have a snapshot of the whole page, or you can choose from the available datablocks of that page.
...
3.1 To copy an existing schedule job,
Click on the Copy from existing job dropdown and select a schedule job you want to copy.
Enter a Schedulejob Name, e.g. “Every 5 hours”. It can be any name
. Then fill in the schedule information. The schedule can be daily, weekly… choose the required one. Under “Start,” choose the starting time and date of the new schedule. If you would like to have an expire date for the new schedule, tick the “Expire” box and choose the end date and time for that new schedule. In “Repeat task every” box, choose the minutes you would like your task to be repeated.- Choose time zone for the start date for when report generator executes.
- In “File Type” choose the type of the report you would like your report to be.
- In “FileName” enter a name for your report.
- You can choose to have your document in landscape mode or portrait mode.
- Description position can have one the values top, bottom, left, right or None. If you would like to have text next to your images you can choose where in the page you would like to have your text added. If you choose "None" value then there won't
.
3.1. To apply an existing schedule to the selected page/s,
Click on the Choose from existing schedule dropdown and select an existing schedule you want to apply on the selected page/s.
3.2 To add a new schedule for the selected page/s,
Click on the Choose from existing schedule dropdown and select Create New Schedule.
Enter a name on the Schedule Name field.
Fill out the schedule information.
4. Select a frequency from the radio button options.
5. Set the Start date and time.
6. Select a timezone from the Timezone dropdown for when the report generator executes.
7. Tick the Expire checkbox to set an expiration date for the schedule and set the expiry date and time.
8. Click on the FileType dropdown and select a file type for your report.
9. Enter a FileName for the report.
10. Select an option from the Description position dropdown.
If None is selected, there won’t be any text added to your document. This option is only available when the
...
File Type is MSWord.
11. Click on the Landscape Mode dropdown and select Yes for landscape or No for portrait.
12. Tick the Send Email checkbox to send the report just after its creation. The created report will be attached to the email being sent.
- If the “Send Email” box is ticked
Enter the
sender email in “Sender Email” boxSender Email. If there are multiple recipients,
pleaseuse comma to separate them,
likee.g. "Email1,Email2,Email3".
Enter
email that needsthe Email to be sent
in the “Email” boxIf a cc email is required enter it in the “cc” box. If.
Enter CC email. If there are multiple recipients,
pleaseuse comma to separate them,
likee.g. "Email1,Email2,Email3".
- If a subject for the email is required enter it in the “Subject” box
- If any text with the email is required enter it in the “Mail body” box
- Save the settings.
Enter email Subject.
Enter Mail Body.
13. Click Save.
Now every time the scheduler runs, a new report will be created. All the pages that are chosen will be saved in one document.
...
Archive
All created reports are archived. You can see the new and old reports in the schedule page that was mentioned in first step (Manage => Schedule ). Here in this page you can see Schedule page (Step 1). On the Schedule page, the list of available schedules . By choosing the “History” button. You can see is displayed.
Click History to display the list of reports created by this schedule. In order to download them follow the step below:In Dashboard page go to Manage => schedule section. Choose the required schedule for the report and choose the “History” button. It will show a list of all created reports for the selected schedule. After choosing
Click on the required reports, the report will start downloading. The button “Run now,” next to the History button, runs reports to download them.
Click Run to run the report at that the moment without waiting for its scheduled time.
...
Excel
...
Report
Before 6.0.1, Wxcel Excel report will be adding the screenshot of the report to the Excel file and send it through email.
After 6.0.1, Excel report will export cube report grid and drillthrough data properly into the Excel file. The whole drillthrough dataset will be exported.